

Match and Attach for Payroll Runs
Attach timesheet backup documentation directly to timesheet records inside a Stafftrak payroll run — so every file travels with the run through export and final verification.
WHAT’S INSIDE
Stafftrak has a process for attaching timesheet documentation to the appropriate timesheet directly in the payroll run. This feature, we name, Match and Attach, stores timesheet backup documents with the payroll run by attaching files directly to the timesheet records inside that run. The files stay with the run through export and final verification. This enables faster invoice delivery and enhances accuracy.
THE BASIC PATH – STEPS FOR MATCH AND ATTACH – AT A GLANCE
|
1 Note the Green Flag Indicator
|
|
2 Add the Timesheet Backup File(s) Checkbox a green-flagged timesheet row, select Add File to open the File Upload dialog (or double-click the Upload icon). Add Files using drag and drop, or Browse to attach the file(s) (25 MB limit). |
|
3 Confirm the Upload of the backup file(s) After the File Upload process, use the Files tab to check that the Status column reads Uploaded. |
|
4 Verify the Exported Timesheet Backup File(s) after Export After exporting a payroll run, to view the timesheet backup documents, use the Exported Files tab, noting the correlating TSId & Timesheet Id. |
|
5 View Files before Export |
Steps to Match and Attach file(s) to a Timesheet Record
Open the desired Payroll Run to view and modify timesheet lines.
STEP ONE: Green Flag Indicator
- Within the payroll modify screen, timesheet lines are shown. When there is a green flag in the Bckp column, this indicates that timesheet record expects a backup file to be uploaded.
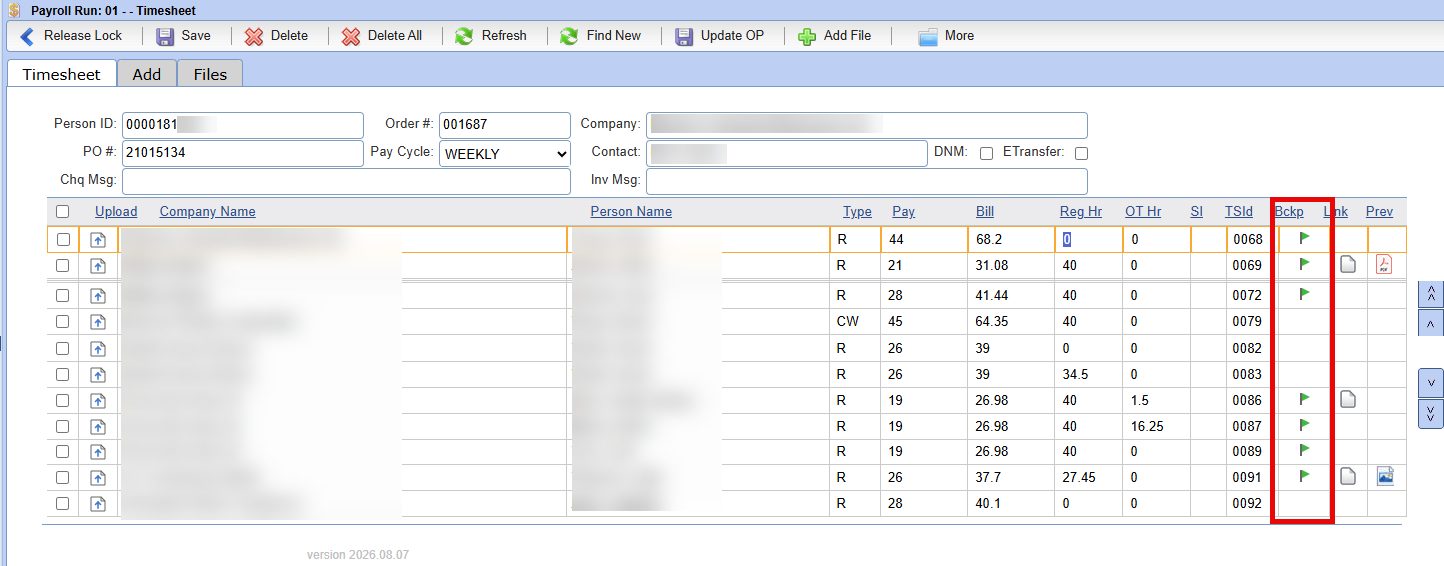
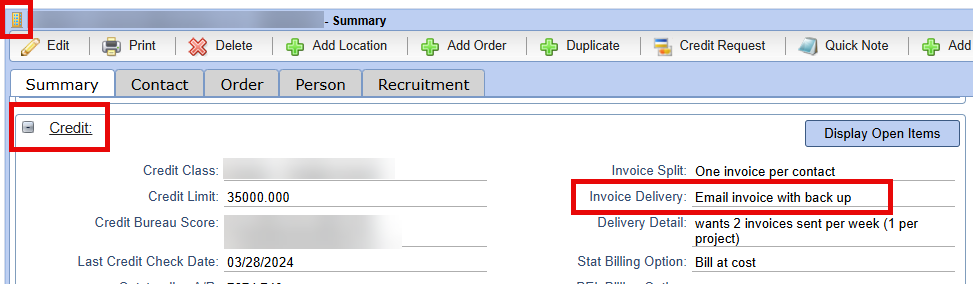
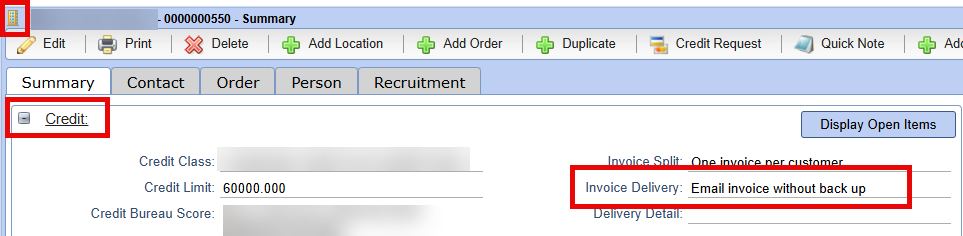
- The green flag displaying or not displaying correlates to the Invoice Delivery field selection seen in the Company file. To review this setup, select the timesheet line, and then select the name in the Company field seen in the upper section.

-
Scroll to the Company file’s Credit section, and note the Invoice Delivery field selection.
- Selections noting – with backup – will show the green flag
- Selections noting without backup – will not show the green flag
STEP TWO: Add the Timesheet Backup File(s)
-
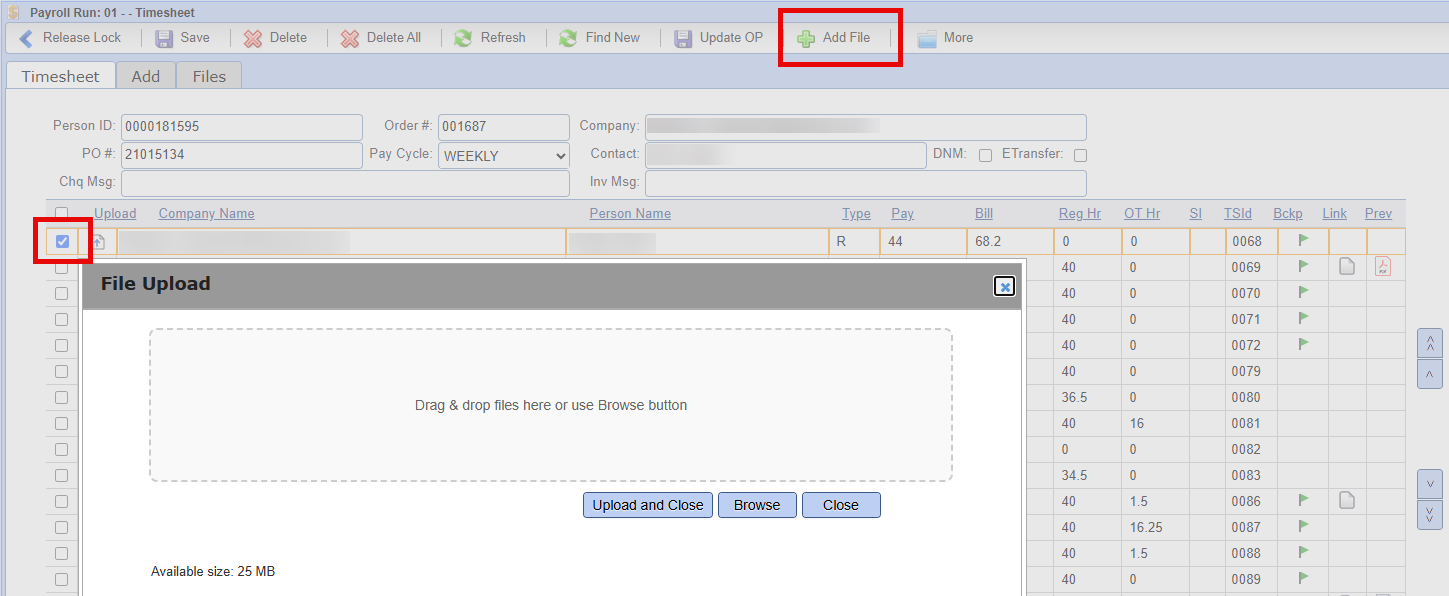
For those lines with a green flag status, the timesheet backup should have files added/uploaded. To add/upload the timesheet backup file, checkbox the Timesheet record, then select the toolbar button – Add File.
-
Using the File Upload dialog box, navigate to upload file(s) (for that timesheet record), and complete the upload.
- Drag and drop files into the window, or Browse for file(s) to attach to that particular timesheet line/record (25 MB limit)
- Continue the Upload by selecting Start, to view its progress, or select Upload and Close to continue and exit the dialog
Note: Double-clicking the icon in the Upload column also brings up the File Upload dialog box.
STEP THREE: Confirm the Upload of the Timesheet Backup File(s)
To view all added/uploaded timesheet backup files, open the payroll run and select the Files tab.
Status column – will show Uploaded (if successful)
Link column – double-click the icon to download and view the uploaded file
Prev column – double-click the icon to view the file in a PDF viewer

Recognizing the Connection – Timesheet Id / TS Id
- While viewing the Timesheet Tab, note the TSId column, which shows a unique line number for each timesheet record.
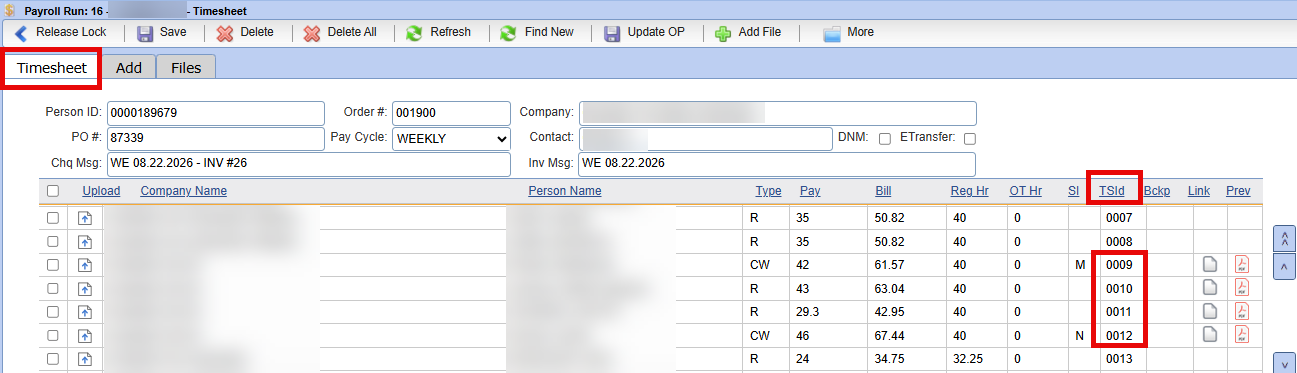
- While viewing the Files Tab, note the Timesheet Id column, which shows a unique line number for each added/uploaded timesheet backup file.

These two numbers connect the timesheet record to its corresponding timesheet backup file.
Deleting an added/uploaded Timesheet Backup File(s)
- To remove an added/uploaded timesheet backup file, from the Files tab, checkbox the line of the file to remove, and choose the Delete button from the toolbar.

-
The system will remove the file (without a confirmation prompt).
If no files are present, a message is shown.

-
After removing a timesheet backup file, be sure to upload the appropriate file.
Remember to use the Refresh button in Stafftrak as needed. Sometimes an action may seem not to have worked, but Refresh to be sure!
Manage Timesheet Backup Documentation Files
Open Payroll Run Modify and go to the Timesheet tab. From there you can:
- Delete a record that has no file attached. A record with no file attached is removed immediately, with no confirmation message.
- Delete a record that has a file attached. You confirm the deletion first, and the related file is either removed or changes to the status To Be Deleted.
- Download a file. Double-click the link icon to open.
- Download ZIP. Downloads several selected files together as a .zip file.
- Preview a file. Double-click the Prev icon to view the file using a PDF viewer.
NOTE: After a deletion, refresh the view or switch tabs. The File tab then shows the updated state.
STEP FOUR: View the Exported Timesheet Backup File(s)
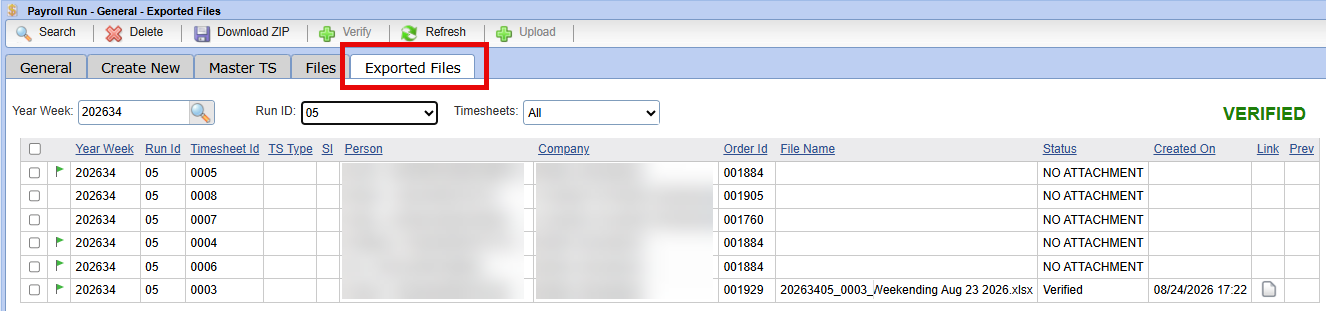
- After a payroll run is exported and then processed, the timesheet backup files can be viewed from the Exported Files tab.
-
Within the Payroll Run area of Stafftrak, enter the desired Year Week, select the appropriate Run ID from the drop down, and choose whether to view All timesheets, or only those with or without an uploaded file.
Select the magnifying glass to view the results of your search criteria.
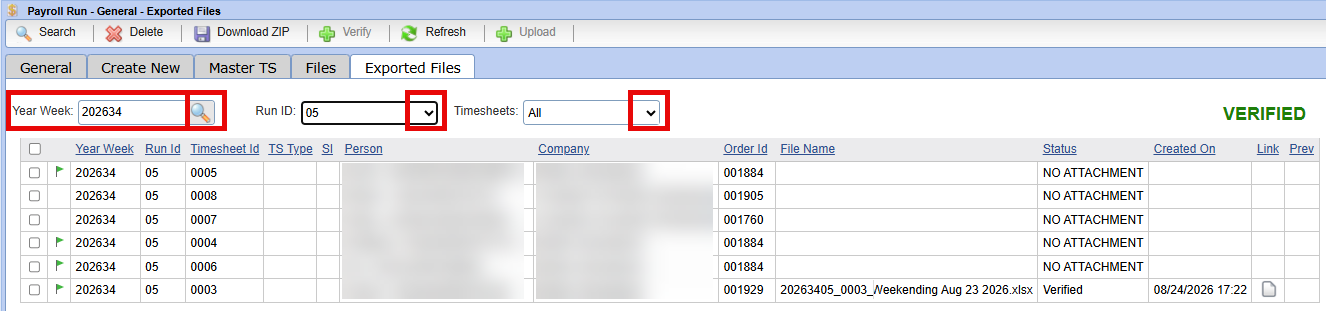
NOTE: After a payroll run is Processed, the uploaded files cannot be deleted or added.
STEP FIVE: Verify the Uploaded Timesheet Backup File(s)
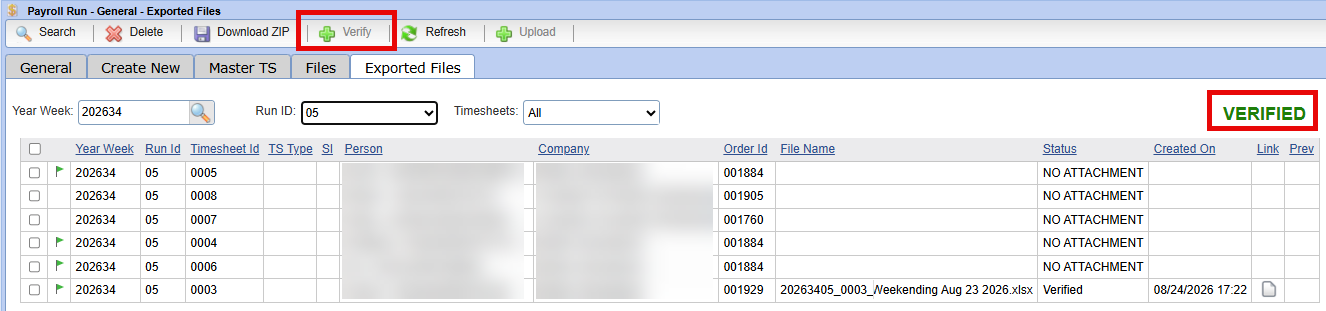
After a payroll run is exported, the final step is to review the timesheet backup files and mark them as Verified. This step is vital as it ensures the uploaded files and timesheet values are accurate.
-
From the Exported Files tab, enter the desired Year Week, select the appropriate Run ID from the drop down, and choose whether to view All timesheets, or only those with or without an uploaded file
- Checkbox the timesheet line(s) and select the Verify button. The Verified indicator will show.
Troubleshooting
|
❕ No green flag on a timesheet record The green flag follows the Invoice Delivery field on the Company file. Open the timesheet record, scroll to the Company file’s Credit section, and check that selection — options noting – with backup – show the flag; options without backup do not. |
|
❕ A file is stuck in the status Created The file record exists but the file did not reach storage. From the File tab, select it and choose Re-upload. If it will not move to Uploaded, report it before the run is exported. |
|
❕ The action looks like it did not work Select Refresh. Stafftrak often needs a refresh, or a switch between tabs, before the updated state appears — this is the single most common false alarm. |
|
❕ Records will not add to a run The records already belong to an exported or processed run. The action is blocked and the existing run is unchanged. Use the run those records already belong to. |