
Payroll Documentation |
Introduction
|
Stafftrak Payroll is designed to pull Persons who have been Active on an Order during a specific date timeframe. These people are pulled into a list of timesheets allowing ease of entry of their hours. Their hours are to be based on the client approved timesheets that have been received. Payroll is entered on a weekly, bi-weekly, semi-monthly or monthly basis. People2.0 will process payroll weekly, and all deadlines remain the same. PAYROLL DEADLINES
|
4 MAIN STEPS TO PAYROLL
1
- Create your Payroll Run. This is the process where you will command the system to find anyone Active on an order between two dates. This process relies on you putting people Active on Orders, with the correct dates, when you place them out to clients. If people are not put on orders or if dates are incorrect, the payroll creation will be incorrect, potentially leading to both payroll and invoicing issues.
- Modify Payroll. This step involves entering the hours based on the timesheets that have been received from your end user companies. This is also the step where you would Add Stat pay in a week where this was necessary or Add GST if you have any pre-approved contractors out to work.
- Verify the Timesheet Report. A report is printed allowing review of pay rates, bill rates and hours entered. People2.0 recommends strongly this is completed each week by a different person than performed the entry to catch any errors before payroll and invoicing is generated. In the payroll system you will not be able to export payroll without printing the Time Sheet Report. This report file should be saved with your payroll weekly for future reference. The report can also be generated again through Stafftrak in the future.
- Export the Payroll Run. This is the step where your payroll is sent to People2.0. This step should not be completed until you are 100% certain that what you have entered is correct and your report has been verified. Once your payroll has been exported it will be processed by People2.0. At this point, any found errors will have to be corrected using adjustments or a Credit or Debit note.
Note: After the above 4 steps are completed, be sure to send in timesheet backup.
ESSENTIAL PRE-PAYROLL SETUP
1
-
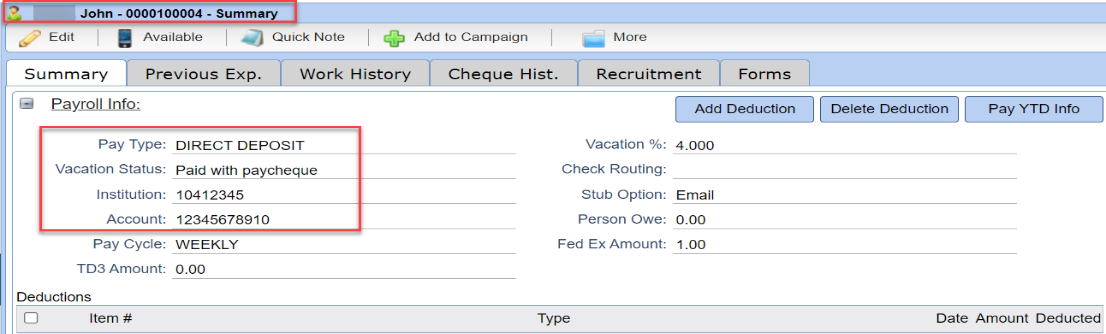
Ensure Persons have accurate and up-to-date payroll information in their Person file.
-
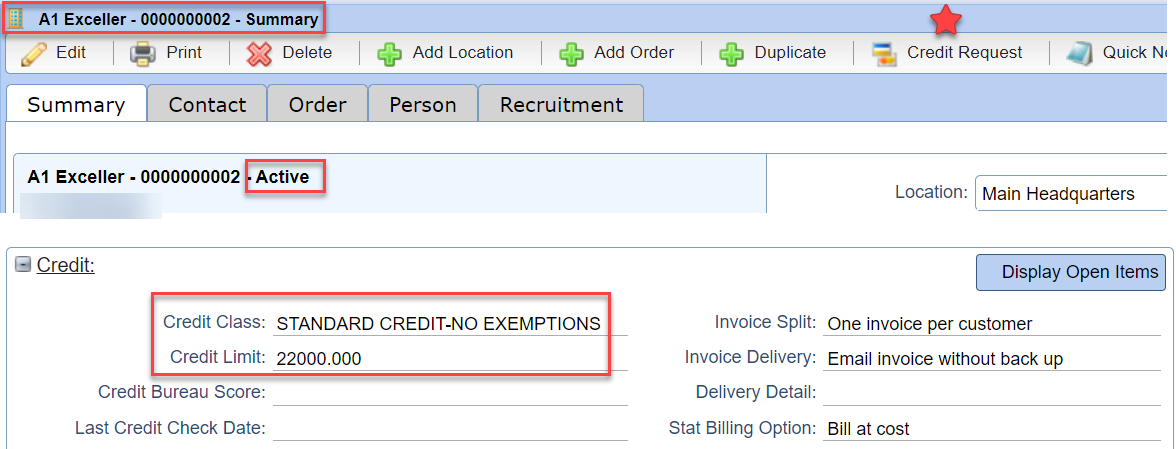
Ensure the Company is Active with Credit assigned in their Company file.
Note: Remember to submit a Credit Request if the Company is new or requires additional credit.
-
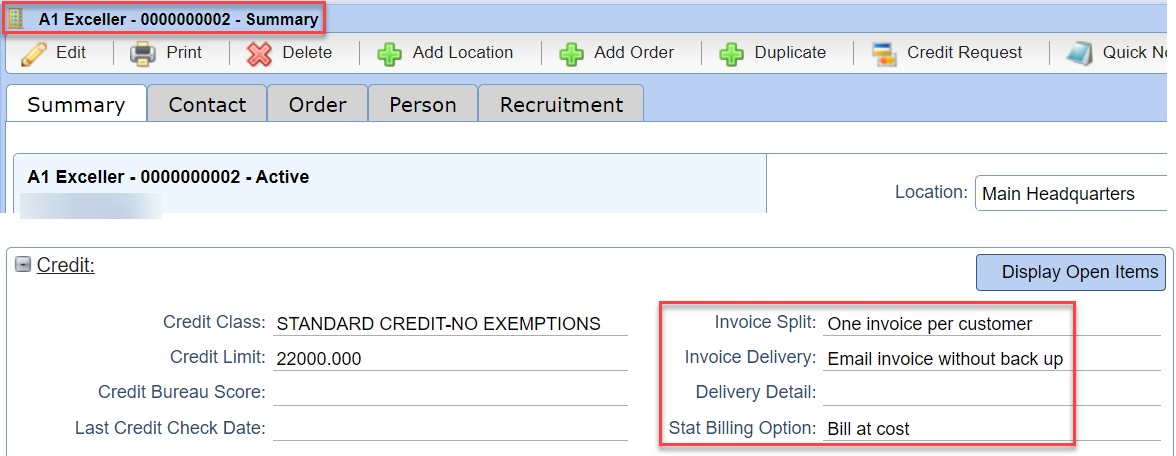
Ensure Invoice Split, Invoice Delivery, and the Stat Billing Option are setup accurately.
-
Ensure the Order has the Person Active during the date timeframe of your payroll run’s week.

ACCESS THE PAYROLL AREA OF STAFFTRAK
1
- Select the Payroll toolbar button.

- The payroll system will default to the current payroll Year Week. The payroll year week is based on your province’s Payroll calendar (see the Index toolbar button). The system shows any runs that have been created so far in that payroll year week as well as the status of that run in the Action column.
STEP 1 – CREATE THE PAYROLL RUN
1
- Select Create New, and indicate your selections. See below for additional detailed instructions.
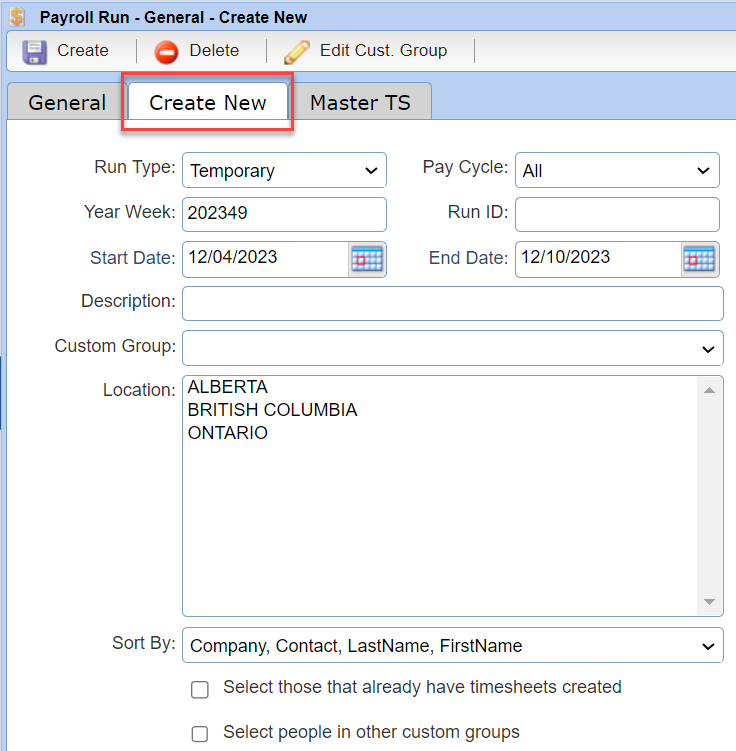
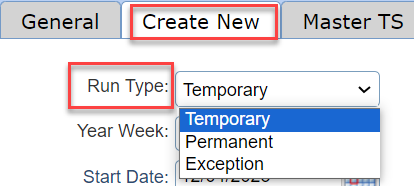
RUN TYPE:
-
- Temporary: System default used for assignment employees on temporary assignments and pre-approved contractor payroll.
- Permanent: Used to create a run for a permanent invoice, these runs use Run ID’s from 50-55. If you do not currently process Perm invoicing through People2.0, please contact your Client Service representative for information on how to set this up and related fees for Perm Invoicing.
- Exception: Selecting this run will create a blank run allowing you to enter the person of your choice. Often used when creating a vacation run for someone or paying adjustment hours. If the run should be paid as soon as possible, use Run ID’s from 80-89, as they are paid on the next banking business day rather than waiting for the next payroll pay date.
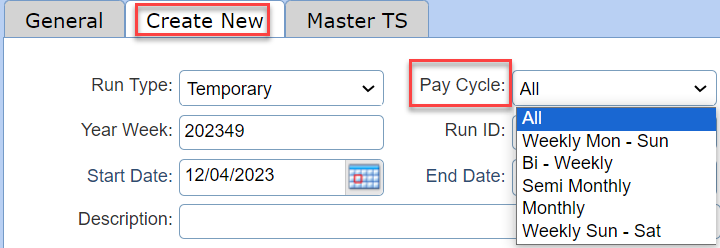
PAY CYCLE:
This allows you to create runs based on the Pay Cycle that is selected on the person files. If you run payroll and have multiple cycles depending on company or person requirements this will allow you to create the appropriate runs. By changing the pay cycle, your default dates will also change accordingly.
- All: System default and will pull everyone active.
- Weekly Mon – Sun: Select to pull those with weekly payroll. The Start:/End: Dates will recognize
Monday to Sunday of that payroll week. - Bi–Weekly: Select to pull those with bi-weekly payroll. The Start:/End: Dates will change according
to the 2 weekly cycle dates. - Semi-Monthly: Select to pull those that are paid 1st-15th and 16th- end of the month.
- Monthly: Select to pull those with monthly listed on their Person file pay cycle.
- Weekly Sun-Sat: Select to pull those with weekly payroll. The Start:/End: Dates will recognize
Sunday to Saturday of that payroll week.
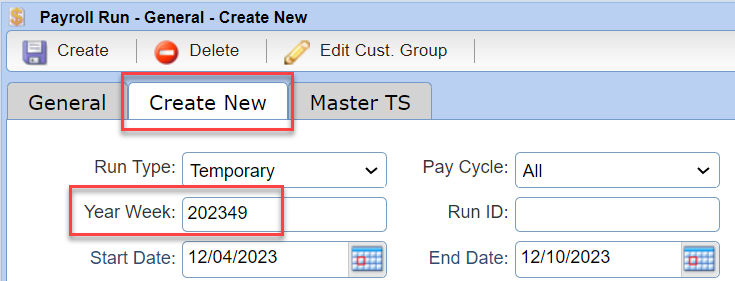
YEAR WEEK:
This will default to the current week and should not be changed.
Note: Each week Payroll closes on Thursday morning and the Year Week is moved to the next week so you will no longer be able to export a run from the previous week ending. Contact us for assistance.
RUN ID:
The Run ID must be unique to that Year Week two digit Run ID number.
Example: 01, 02, 09, 10, 11, 50, 80.
- A Run Type of Permanent should use Run ID’s 50-55. These numbers are set up for perm runs only as there are specific rules for permanent run types.
- Run ID’s 80-89 should only be used when you want the person’s pay cheque to be dated with the current date. These are ASAP runs that should be used only when you need payment as soon as possible.
- Please do not use runs 90-99 as these are reserved for People2.0.
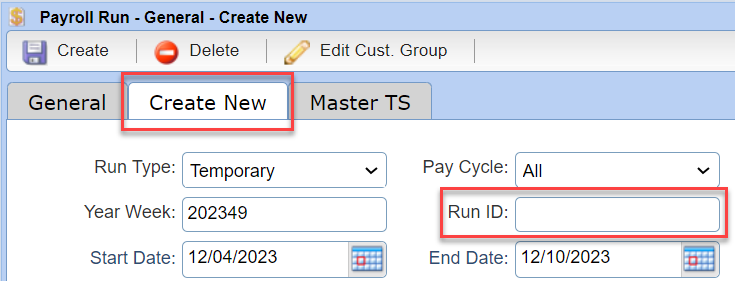
START DATE / END DATE:
These dates will be automatically set based on the selection from the Pay Cycle, if you need to override the default dates you are able to do so.
DESCRIPTION:
You may enter in a description or allow the chosen Location to default as the name of the payroll run.
CUSTOM GROUP:
You may choose to have some companies set up in a separate Custom Run or Custom Group. When you have a larger company, and you would like to separate their payroll onto their own run this can be done.
This is also used for any company set up on a Swipe clock.
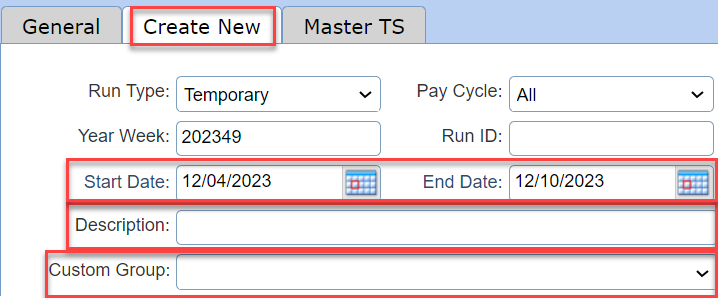
Note: To learn more about setting up a Custom Run or Custom Group, visit the Stafftrak Help Site (by selecting the Green Checkmark toolbar button) and search for helpful documentation.

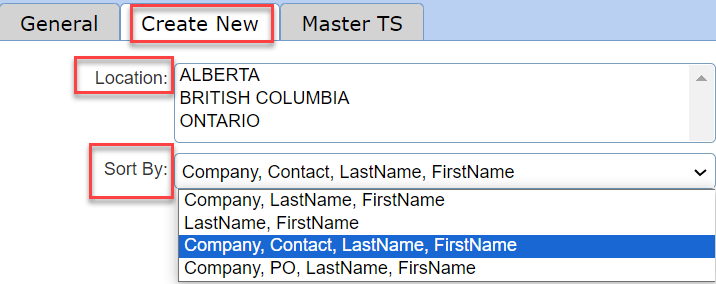
LOCATION:
Select the desired location for this run, each Province will require to be on its own run. If you are placing people in multiple provinces you will will see multiple items in the location section.
SORT BY:
Choose the order of how you would like to see the items displayed in your next step – Modify Payroll. By default the sort is set to Company, Lastname, Firstname which is typically the most effective for payroll entry.
ADDITIONAL OPTIONS:
-
If you have people already on Runs in the same week, they will not appear on the run you are creating. This is because the system knows they already had timesheets in the week and is attempting to prevent the accidental duplication of timesheets. This usually happens when you have late runs entered on a Thursday or Friday. If you need to include those timesheets, select the checkbox “Select those that already have timesheets created”.
- The system automatically understands those timesheets found on any Custom Group / Custom Runs and will not include them when you create a non-custom run. This is to prevent duplicating timesheets. If you need to include those timesheets, select the checkbox “Select people in other custom groups”.

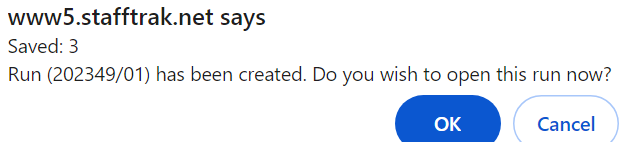
- After completing the Create New tab selections discussed above), select the Create button.

- A Stafftrak message shows the number of Saved timesheets in your Run, and lets you know the Run has been created. It asks if you wish to open the Run now (select OK), or return to the General payroll screen (select Cancel).
STEP 2 – MODIFY THE PAYROLL RUN
1
The Modify step involves entering the hours based on the timesheets that have been received from the end user company for the employee who worked. This is also the step where you may Add Stat pay as necessary or add GST if you have pre-approved contractors out to work.
-
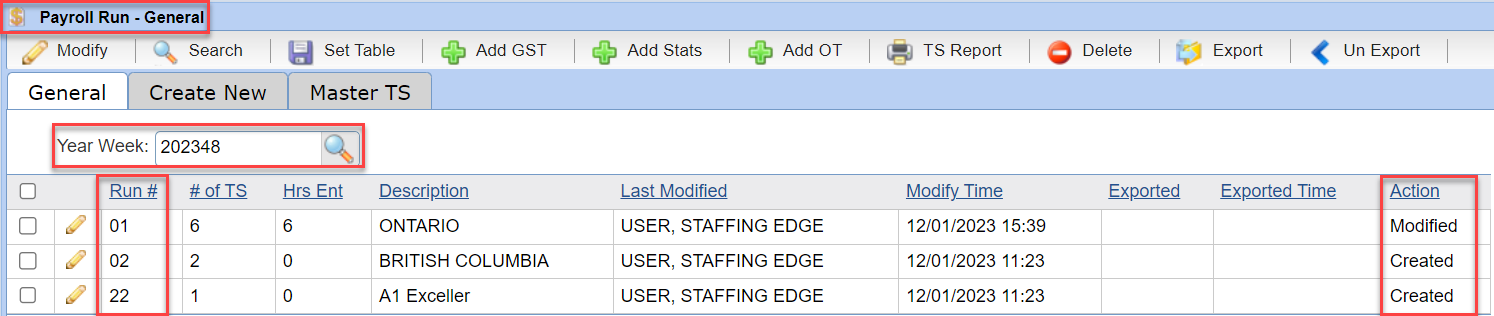
After completing Step 1: Create a Payroll Run, each payroll run created will show in the Payroll Run – General window. The Run # you supplied, the # of TS (total number of timesheets that run contains), of those timesheets which have had any Hours Entered (modifications), along with the Description, and information about who and when any modification and exporting may have occurred.
The last column, Action, shows the status of the Payroll Run. If the Run was just created, but no hours have yet to be entered, the Action status will show as Created.
- To Modify an existing payroll run, and begin to input hours, select the checkbox next to the payroll run, then select Modify. Or you may double-click the line of the payroll run you wish to open.

Note: Select the pencil icon (on the payroll line) to modify the description.

-
In the Payroll Run Timesheet window a line for each separate timesheet is seen.
Select a timesheet line and note the top window shares information for that particular timesheet.
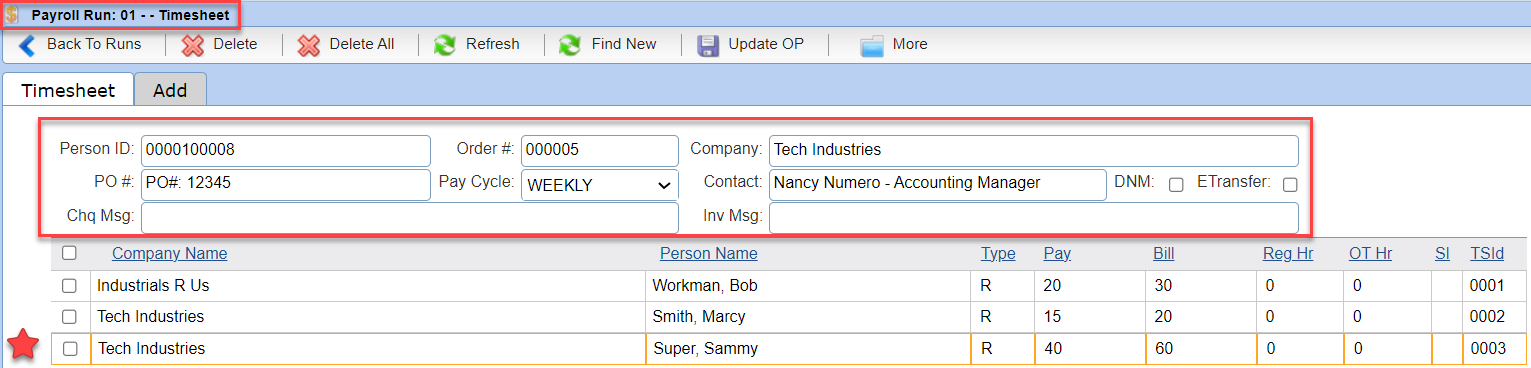
Note: Person ID, Order and Company have hyperlinks that will directly send you to the file you selected.
- Timesheets seen are for Persons, from the selected Location, who are Active on an Order, from an Active Company, during the date frame of your specific Payroll Run. Timesheet information comes from what has been entered in Orders. It is important to ensure Orders are up-to-date with correct information, such as: pay, bill, Person assignment dates, and PO#’s.
-
Each timesheet row shows the following (with descriptions of their purpose):
- Company Name: This is the name of the company where the person is working that should be sending an approved timesheet for hour entry. This name will appear on the invoice. Company names should be updated before payroll runs are created. You may not change this here.
- Person Name: This is the name of the assignment employee or contactor working at this company. If the person did not work, delete the line.
- Type: This is the pay type that will drive both taxation to the person and the invoice. To see a list of options, enter X in the field and hit enter. If you require a timesheet type that is not in the dropdown menu, please contact Client Services. If you are unsure what timesheet type to use, please contact payroll for verification.
- Pay: This is the pay rate (to the worker) as it has been entered on the order. If this is incorrect you can change the field. Please note that this will override what is on the order for
THIS WEEK ONLY. To make the change moving forward go to the Order and update the information. - Bill: This is the bill rate (invoiced to the end customer) as it has been entered on the order. If this is incorrect you can change the field. Please note that this will override what is on the order for
THIS WEEK ONLY. To make the change moving forward go to the Order and update the information. - Reg Hours: This is the number of Regular hours that you will enter from the approved client timesheet.
- OT Hours: This is the number of Overtime hours that you will enter from the approved client timesheet. Please note that the system will automatically calculate both the Pay and Bill at 1.5 times.
- SI (Separate Invoice): This field is used to override what is indicated in the Invoice Split option of the Company file. Entering a letter in this field will pull anything with that same letter onto its own invoice.
- TSId indicator: Used by the system to track the separate timesheet lines. You may not change this.
-
Toolbar buttons and their use:
- Back to Runs: This button returns you to the list of all payroll runs (aka the Payroll – General window).
- Delete: By selecting the box on the left of a timesheet line and selecting the delete button, the line will be removed from the run.
- Delete All: This button is used, once all of your payroll has been entered to remove all timesheets that do not have any hours entered. This will make your TS Report much cleaner for verification.
- Refresh: Use Refresh to re-sort /organize the information seen in the run. This is helpful when you have multiple timesheet lines for one person as you will see them grouped together.
- Find New: This button is useful when you have people that have fallen off orders and did not appear on your run when you created it. If you go back to your orders and extend the end dates and then come back to the run, select Find New and the system will add them to the run so you don’t have to manually add each one.
- Update OP: text.
- More: This button contains additional options (described below).
- Search: Use this to quickly find the timesheet line of a person in a very large run. You can search your run based on the following criteria: Company name/ Contact name/ Last name/ First name/ Middle name.
- Mass Edit: Make changes to multiple timesheet lines at one time. Check off the timesheet lines you wish to Mass Edit, select More, then select Mass Edit. Enter information in whichever field you want to mass edit and the change will appear on all timesheet lines you have checked.
- Also under the Mass Edit is a Duplicate function that allows you to mass duplicate selected lines, please be careful when using this function as it duplicates all fields, if you have hours entered already, these will also be duplicated.
- Add GST: For use by people who have approved Independent Contractors that are out to work. Once your payroll has been completed for the run, select the run, select the More menu, then the Add GST button. This will add another timesheet line and automatically calculate the GST or HST (depending on province) taxes according to Federal and Provincial laws.
- Add Stats: This button can be used to automatically add Stats for members in Alberta, Manitoba, Ontario, Quebec, and Saskatchewan. Once your run has all the hours entered, please select your run and select More, then Add Stat. Anyone eligible for stat will have a line entered onto the payroll run. To see the full instructions on how to add Stat Pay, please visit Section 37 – Add Stat Instructions found in the Stafftrak Help Site (green question mark on the toolbar). For all other Provinces and Territories, you will need to manually calculate Stats and enter them as a an additional timesheet line for each eligible worker, using the Stat timesheet type. For more information on how to pay stats, please contact our Payroll Department CANpayrolldept@people20.com
- Add OT: This is a short cut that must be pre-programmed for a Member and is used when a Company is being billed their overtime at a different markup other than 1.5 (the standard overtime bill rate). To find out more about this option please speak with your Client Service Representative.
- Add Vacation: This will give you the choice of adding all Outstanding Vacation Pay OR adding All Outstanding Vacation Pay plus Current Weeks (what is being generated on that particular run). The system will automatically pull the amounts from the Person file YTD earnings and create your vacation timesheet line for you. The Type will be V (Vacation). Be sure to enter the number 1 in the Reg Hr column.
- TS Report: This is a quick link to view your Timesheet report for verification (see Step 3 below).
Chq Msg: There are fields allowing you to create indivualized messages that will appear on the Person’s Pay Stubs. You can create one message for an individual or by utilizing the Mass Edit function, you could create the same message on muliple timesheet lines. The character limit is 100.
Inv Msg: There is also the capability to add Invoice Messages, this will create a new line on the invoice, directly under this person’s regular invoice line. Again you can choose to add individualized lines or Mass Edit to add this message to mulitple lines on your invoice. The character limit is 100.
STEP 3 – VERIFY THE TIMESHEET REPORT
1
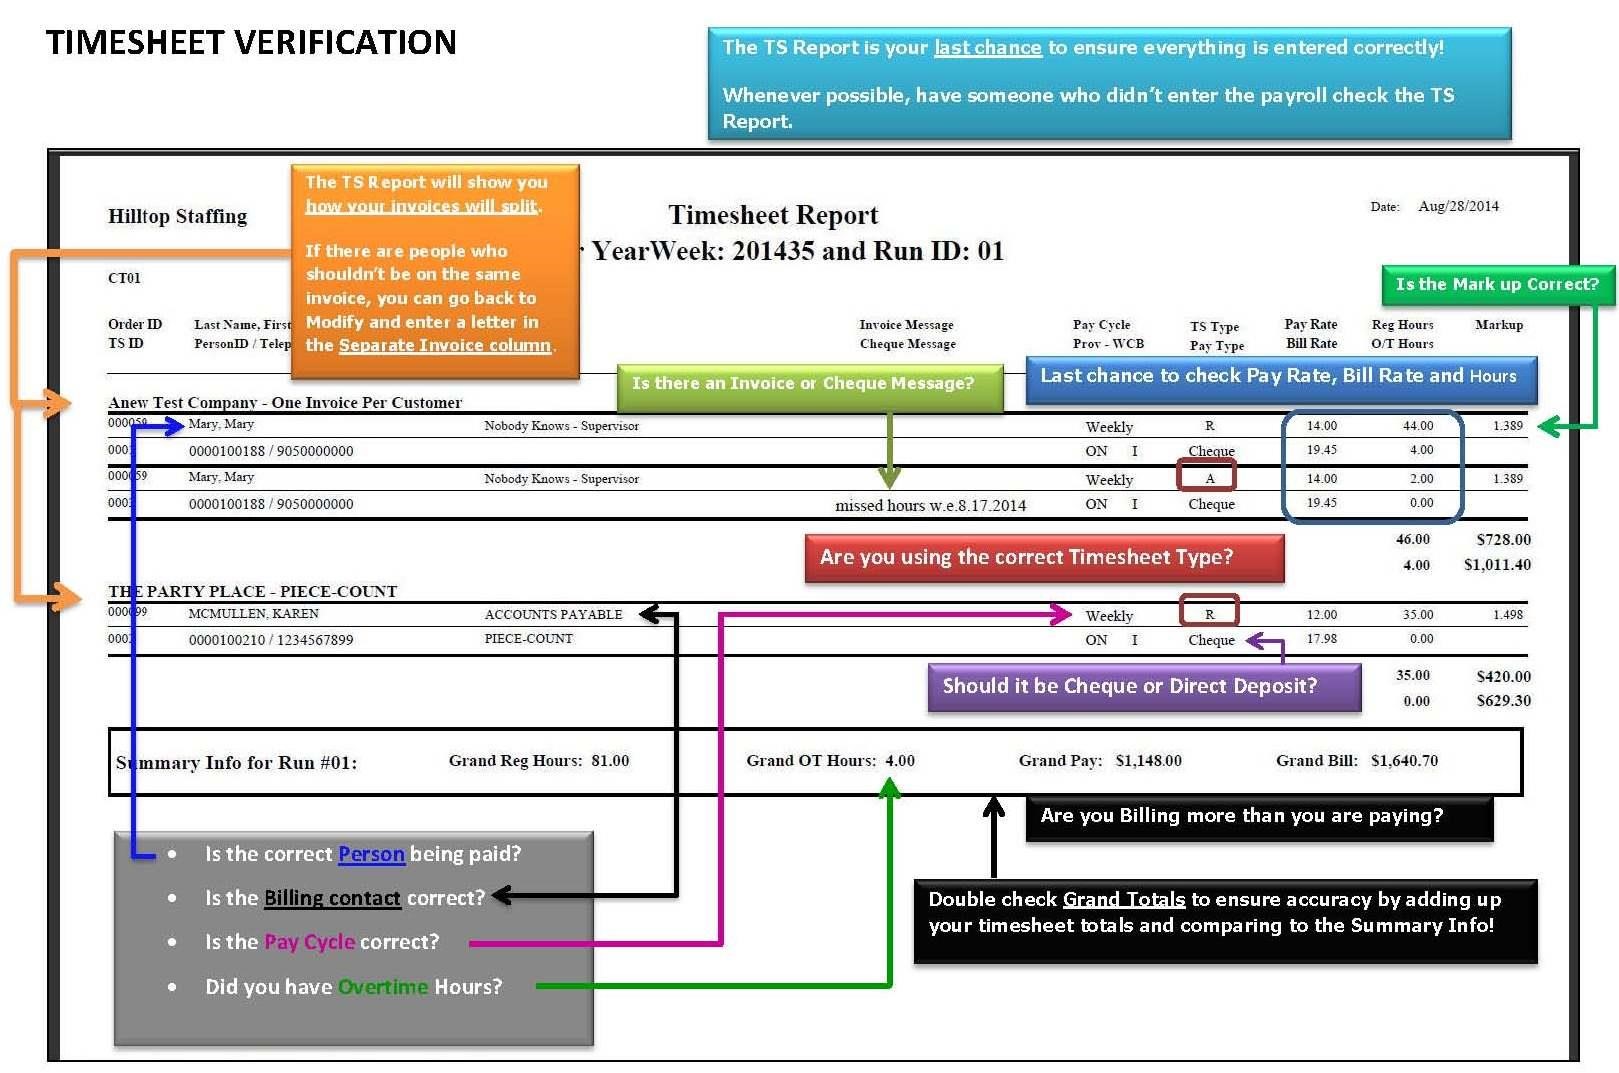
The Timesheet Verification step is crucial! Always review the TS Report BEFORE you export the Run.
Note: If this step is skipped it can result in incorrect pay, incorrect invoicing and hours of work to correct the errors.
- Select the box to the left of the payroll run you would like to verify, then select the TS Report button.

- Review the appropriate Year Week and Run Id number are referenced, make selections from the drop-down options for how the resulting report should be organized and displayed (recommendation is allow the defaults), and select Create Report.
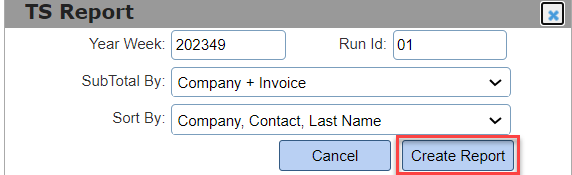
- Select the downloaded report.

- Review the TS Report. Several items to look for are:
- Are you paying the correct employee?
- Are you billing the correct Company and is the Billing Contact correct?
- Is the Invoice going to split correctly (by Contact, Dept or Purchase Order – and is the PO# correct)?
- Did you use the Correct Timesheet type on every Timesheet line?
- Is the Pay Rate and Bill Rate correct on every Timesheet line?
- Are the Hours correct? Are there Overtime hours?
- Is the person being paid by Cheque or Direct Deposit?
- Is the Pay Cycle Correct?
- Does the Mark up value make sense?
- Do you need to add a Cheque Message or Invoice Message?
Note: People2.0 strongly recommends this step is completed by a different person than who performed the entry. Fresh eyes help to catch any errors before payroll and invoicing is generated.
In the payroll system you will not be able to export payroll without printing the Time Sheet Report.
 3
3
- The totals for each sub-section are listed, please note that this is pre-buden numbers, payroll burden costs are calculated at the time of export
- We recommend totaling timesheets from each customer against the total hours listed and verifying that each section has a Billing higher than the Pay.
- There is a Summary section at the bottom of each run that also allows for total hours, pay and bill. Again, ensure that verification of each of these items is taking place. At this point there is still an opportunity to make adjustments.
Note: If you do find that updates need to occur, go back to Modify and make the necessary changes, then reprint the TS Report and verify the updated changes.
People2.0 recommends filing your payroll by Year Week and keeping all timesheets and verified TS Reports filed by Pay Period. This makes furutre reference for inquiries by either assignment employees or customers very simple.
STEP 4 – EXPORT THE PAYROLL RUN
1
Move forward with this final step only after being 100% certain the information entered is correct and the timesheet report has been fully verified. When your payroll is exported it will be processed by People2.0. At this point, any found errors will have to be corrected with adjustments and Credit or Debit notes.
- Select the box to the left of the payroll run you would like to export and select the Export button.

The next few Export Screens will show any found warnings and potential errors. Review each error carefully. Some errors, such as a missing address or phone number, will allow you to continue without updating the error. Other errors, such as no GST for a contractor, will not allow you to export. Please contact the payroll department for assistance if you are unable to export your payroll run due to a Serious Warning.
- Move through each error or warning, by selecting the Next button. It is suggested to print the payroll report for ease of viewing. A best practice is to have whoever is responsible to sign-off that the appropriate changes have been updated and then file this signed report with your payroll documents for the current pay period. Note: If uncertain about an error, please contact payroll or Customer Care for assistance.
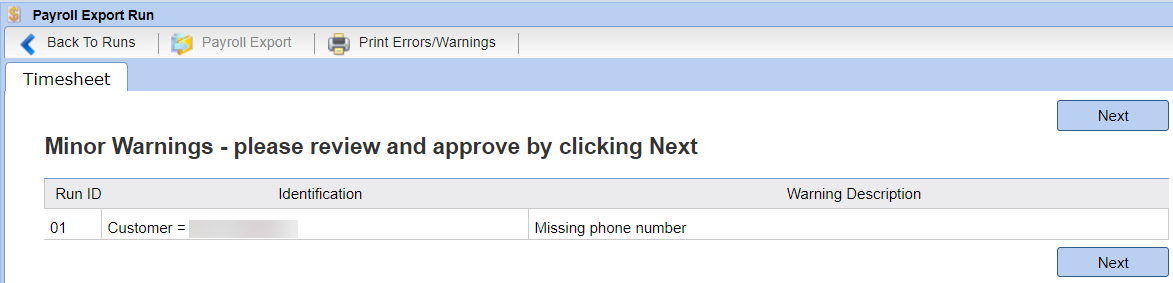
- Selecting the error will directly link to the appropriate file within Stafftrak for review.

- When ready to Export, select the checkbox at the bottom verifying that someone has reviewed the timesheet report, then select the Payroll Export button. At this stage, the payroll has been successfully submitted to People2.0 for processing.

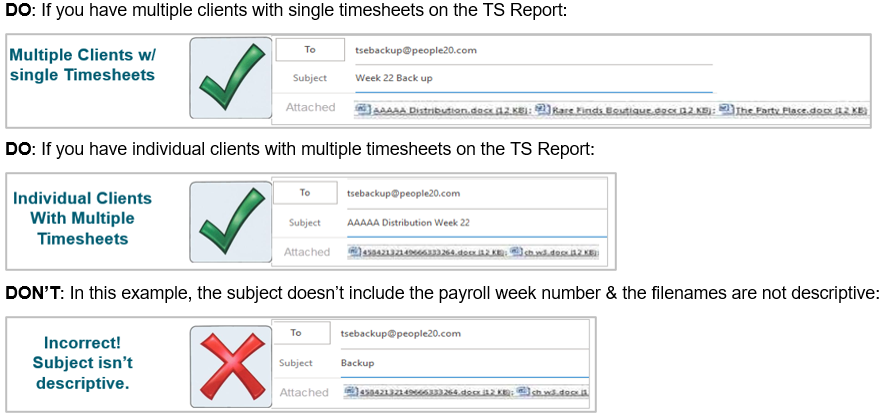
TIMESHEET BACKUP
1
Sending in timesheet backup is a critical final step of the payroll process.
Email: tsebackup@people20.com or, Fax: 905-459-4911
- Include your TS Report pdf file along with the legible timesheet documents in the order they appear on the TS Report.
- The email subject line should include the Payroll week number.
- The attachments should be named descriptively. Don’t allow the filename to be numbers.
PAYROLL ISSUES, CORRECTIONS AND FOLLOW-UP
1
Sometimes there are issues discovered after payroll has been processed. In this case there are several things that may need to be done, depending on what has gone wrong. Again, most issues can be avoided altogether by carefully entering payroll and ensuring that the Timesheet Report is thoroughly checked before exporting.
Trace requests
If an employee says they have not received their pay cheque or their direct deposit payment you will need to take the following steps to resolve the issue:
- Investigate the issue fully. Is the direct deposit that was on the file at the time of export accurate? Check it against the Void cheque again and confirm with the employee that this information is accurate. Was the cheque sent through the mail. If so, was the mailing address on that cheque correct?
- Once determined the person truly has not received payment, enter a Trace Request on their Person File under the Cheque History tab
- If you learn that the direct deposit information was incorrect, update it with the correct information and then submit a Trace Request on the Person file through the Cheque History screen.
- If you have permissions and you have determined that you do not want to make the employee wait for a replacement cheque/deposit then please remember to waive the 15 business day waiting period
Once the payroll department receives the Trace Request, we will do a stop payment if it’s cheque or attempt to recall the funds from the bank account if it’s direct deposit.
Please note that we cannot confirm that a cheque has not been cashed until after 15 business days due to the large number of banks and cheque cashing institutions who could potentially cash the cheque.
For Deposit recalls, we cannot confirm that the money has been successfully recalled until we receive the confirmation from the bank.
Payroll Adjustments
In some cases, you may need to enter an adjustment in a new payroll run to correct a person’s pay. This would be in cases such as the wrong number of hours being paid or the wrong pay rate being paid. It’s important to note that if you overpay an employee, you cannot make an adjustment to take away payment until you are paying the person again. You must have enough positive payroll to deduct an amount from the employee.
If you owe the employee payment, you can enter an adjustment to pay them at any time. If you want it paid right away, please remember to do an Exception Run and use a number between 80-89 to ensure its processes as early as possible.
Credits and Debits
To make corrections to Invoicing a credit or debit may need to be completed. It is a good idea to speak with your dedicated Collector at People2.0 to let them know about the Invoicing Error. Depending on when the error is caught and if it’s a Credit or Debit that is required, they may be able to guide you on how to proceed. In some cases, you may be able to complete a new run on your own to create the Credit or Debit. In other cases, you may be asked to submit a Credit/Debit advice form so People2.0 can enter this on your behalf. If you are unsure, please check with the Invoice/Billing team for assistance.